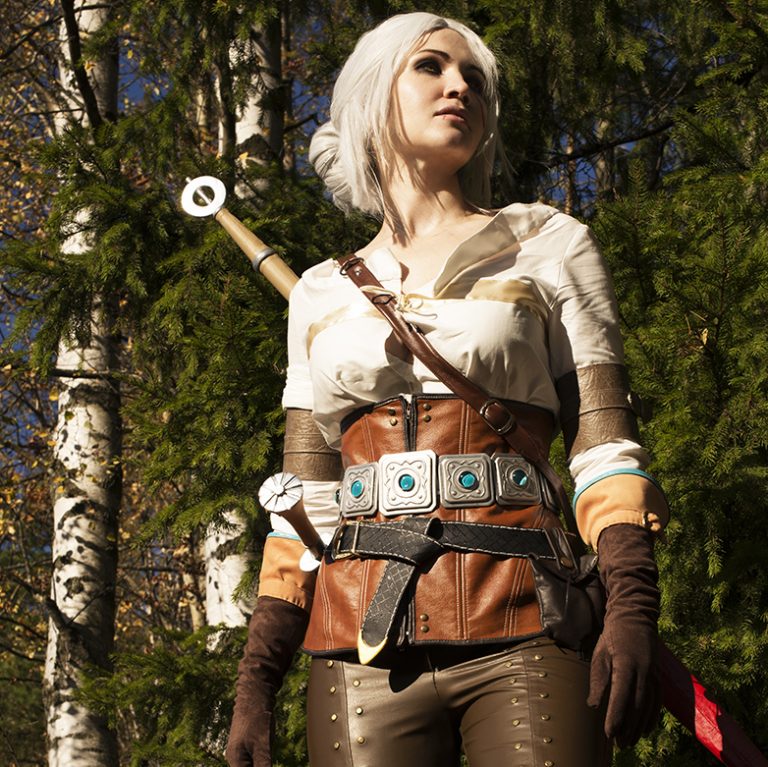
The Witcher 3. Ciri’s costume creation. Part 1
It appears to me that some kind of introduction to the following text is needed here. I made the Ciri costume around two years ago, that’s quite a stretch of time. I’ve come a long way and have grown as a cosplayer since then and I’d have made a lot of costume details differently now. Nevertheless, I think the resultant costume is a piece of fine craftsmanship and I am more than happy with it.
I give a very comprehensive description of the crafting process without leaving out one single detail (I might perhaps be tempted to write a similar guide on Ciri’s weapons one day…Perhaps), I’ve even included several sewing patterns. I hope that my experience will help you gain your own, point you in the right direction, get a new perspective on making a certain workpiece. In other words, I hope that my Ciri will come in useful when you will be on creating you own.

I decided to make the costume pretty much straight after it had been announced that Ciri would be featured in the Witcher 3 game. Geralt and Ciri are my absolute favorites in the saga and the fact that the creators made her an adult young woman, not an adolescent, was a chance not to be missed. And big thanks to the developers for making the costume guide immediately after the game release:

I don’t remember now how much time exactly was spent on the costume, but not too much anyway – somewhere around two months. It’s the finishing touches that turned out to be way more time-consuming, but then again, I could easily spend hours and hours on brushing up the workpieces to perfection. I’ll try to give you the most detailed description possible of every detail that makes part of the look.
The Blouse
I made a custom sewing pattern for the blouse and, as it turned out, a rather good one, so feel free to download it, print it off and get sewing: [download].
At first I bought the original fabric – cotton – as suggested by the guide. But it wasn’t until I brought it home that I realized that it was too thin to sew in one layer, so I had to make it two. Although I was satisfied with the result, one day I chanced upon a more suitable fabric in one of the stores and decided to remake the blouse. It was a milky-colored cotton denim, a very dense fabric.
The first and the final blouse designs:
It’s not exactly cotton, but this fabric looked most similar to the one you see in the game in terms of texture and density, that gave a desired shape to the pleats and the the blouse itself. What I’m trying to say here is that sometimes you need to follow your gut instead of trying to interpret the look far too literally =) Keep an open mind: in fabrics, stitching and even the color.
By the way, I sold the first blouse, which became my first cosplay item ever sold.
Details
The ribbon on the chest is just a typical satin ribbon 5 cm wide. I turned down 0.5 cm on both sides along the future machine stitch. Satin is a very slippery fabric, so it would make most sense to tack it really neat and tight first, and only then do the machine stitching.
The ribbon is sewn tightly around the perimeter. The cord that serves as a drawstring does not run through the ribbon: I’ve seen this been done quite often but to me it just creates excessive surface tension and buckling.
I made two holes on the edges, installed the grommets and ran the cord through them. I threaded both ends of the cord with wooden beads painted in silver and varnished. Judging by the picture below, Ciri has the exact same design in the game (a rare example of realistic detailing of a game costume XD):

At first I thought that one cord wasn’t enough, so I sewed an additional one below, on that part of the blouse that is concealed by the corset (can be seen in the picture). You know what? It wasn’t necessary, not one bit: the corset keeps the blouse securely in place, whereas an odd cord could pop up when you least expect it and ruin the whole thing. That said, I ripped it off.
Sewing Pattern Note
I think it’s clear that there should be two sleeve pieces and two front pieces respectively (one piece as designed on a sewing pattern and another as mirrored), and one back piece. The dotted line on the fabric indicates the crease edge.
The collar is one-piece. First, you stitch the collar to the blouse on face side, then bend it inward along the centerline and press thoroughly (better with the iron), bend the allowances inward and press as well and finally, blind stitch it manually on the inside.
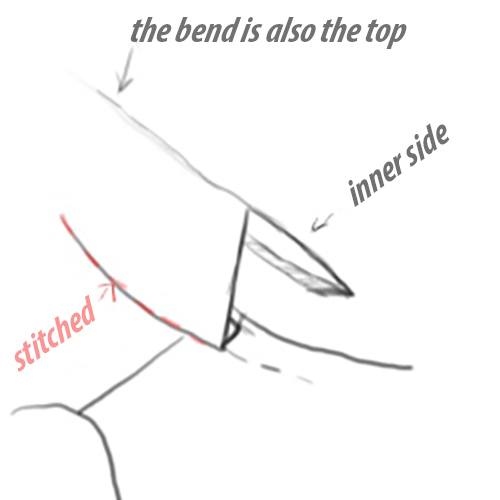
When everything was done, I stitched the collar around the perimeter, as well as the foreparts.
The stitching is purely decorative, in order to create an illusion of hand stitching I set the machine settings on the maximum length (but only for these decorative stitches).
And last but not least, make sure the blouse is shorter in length than the corset, otherwise it would be too much of a hassle to try to tuck it in and you’ll just keep adjusting it so that it wouldn’t stick out.
Pants
It took me the longest time to find a suitable fabric. A shade I was looking for was nowhere to be found. I wandered around the city, been to every fabric store and finally found it in the last one I visited 🙂

The process of making the pattern is as follows: I put on my dark skinny jeans and drew the stitching lines on top of them with a tailor’s chalk, and then transfered these improvised “pattern pieces” onto transparent tracing paper. It would be practical to use sewing pins to fix the tracing paper tightly in place, otherwise the pattern lines might not transfer correctly and get misaligned.
This time, though, everything went smoothly and the pants fit without a wrinkle.
For decoration purposes, I also used 5 mm leathercraft rivets in antique color.

Make sure you fix them tightly in place so that there’s no gap between the rivets and the corset. If possible, buy a rivet setter as it’d be quite a challenge to set the rivets properly without getting them crooked. They are often sold as one kit in most sewing accessories shops: a pack of rivets and a setter of the suitable size.
As I was using a rather thin faux leather, I put an additional small square of fabric on the reverse side, directly under where the rivet would go, to prevent damage to the face side of the fabric while setting the rivet.

Here, too, runs a decorative stitch – you can see it below the horizontal seam across the knee, only that this time I did it manually, as using machine stitching was no longer convenient at that point. (That said, there’s no reason why you can’t do it before arranging all the pieces together.)
Corset
I’ll say at once that I went for a more roomy design as I wanted to feel comfortable wearing the costume, and since my waistline is quite pronounced I decided not to bother with a tight shaper corset.

However, if your waist is not clearly defined, I’d recommend making a cinched up design. It’s more of a hassle, yes, but in return you’ll get a Ciri-worthy shape look =)
In order to draft a sewing pattern I used a tape and a plastic wrap, quite a widespread technique.

I wrapped the plastic food wrap around my waist (so that the tape could be pulled off easily later), then put the masking tape over one side of the body (the corset is symmetrical, so you’ll only need one half of the pattern piece and simply mirror the other at a later stage), and finally drew the lines of the future corset. These are the same as in the game + one more line across the back. The game design has one uniform back piece, whereas mine features two – it was done for a better fit and less ruckling.
I then cut off all the pattern pieces and copied them onto proper paper that became the final version.
If a certain workpiece is a very elaborate one (like this corset), I always make a test version of the design first, using some sort of old fabric that I no longer need. That will help you understand whether you might need to ease the fit or, conversely, gather it up a bit, or maybe even rework the whole piece, and to avoid ruining the fabric that you bought for the costume. No sooner that I’m certain that all the pieces tie together and the corset fits do I start working on a final version.
All pieces that are sewn together have 8 mm allowances. You first stitch the pieces together, space the seam allowances apart and then run a white decorative machine stitch at 5 mm from the seam. As a result, you get a sort of a boning channel in which the corset bones can be inserted.
There’s quite of few different types, I usually use metallic bones that are extremely sturdy but at the same time thin and flexible.

I only used the bones to prevent the corset from wrinkling, not for cinching it up. The bones were inserted next to every side seam, except for the ones that extend diagonally from the waist.

I also used a leather bias tape around the entire permiter.
The corset features a zipper closure, that’s the easiest option you could think of. It’s simply sewn to the corset with the same stitch I used on a bias tape.

As a finishing touch, I set four rivets on each side from the center (two on top and two below).
Boots
I already had the boots with a suitable sole, heel and toecap, but the shaft was no good, so I just ripped off the existing one and put my own in its stead.

I used the same tape-and-wrap technique to draft a pattern as before, only here you have to make sure you leave additional allowances for the wrap.
Be really careful when ripping off the original boot shaft and attaching your own – you could easily gash or pierce or cut your fingers, manufacturer’s stitching is very damage-resistant=)

After I attached the shaft, I overpainted the lower part of the boots so that the entire boots were of uniform color.
Take note of the fact that Ciri’s boots have the upper edges of different length, plus they also feature a decorative stitch around the perimeter. I tried to reproduce these details in my design, too.

I think that the process of attaching the strap is quite clear. There’s only one strap that makes a double wrap around the boot shaft and is inserted in a buckle sewn to the side of the shaft.

I used a very thick and dense faux leather which, in addition to that, is double-layered on top of the shaft, and every so often I had to check the adjustment of the edges and turn them out a bit, for they were constantly straightening themselves up. That said, I’d recommend to opt for a thinner and softer leather.
Part 2 Create bags, belts and gloves
Comments